When it comes to getting people to take action, it’s hard to discount the efficacy of promotions. Businesses that offer promotions and coupons see up to a 50% increase in conversions on average, which can translate to new revenue and additional MRR for your coworking space.
The best part is, customers who use coupons and promotions spend about 25% more than those who pay full price, suggesting that it is more about the psychological feeling of getting a great deal than it is spending money.
With the new year just around the corner, now is the time to start thinking about how to make the most of the busy season and acquire new members through strategic upselling and promotions in your coworking space.
In this article, we’ll share with you how to design a killer promo strategy and execute on it with Optix Automations+.
Designing your promotional strategy in your coworking space
The first step to getting the most out of discounts and promotions is to design your promotional strategy. We recommend starting out by mapping out your goals (what you’re trying to achieve) and KPIs (how you’ll measure success).
Then you can start to think about your strategy (how you’ll achieve those goals).
For example, if your goal is to acquire new dedicated desk members, your key performance indicator (KPI) might be number of dedicated desk plans purchased each month. A few examples of promotional strategies include:
- Offering a buy two months, get one month free promotion for new members who purchase a dedicated desk membership plan
- Offering a credit for any existing drop-in member who purchases a dedicated desk plan during a promotional period like Black Friday
- Upgrade to an annual dedicated desk plan to receive your 1st month free
As another example, if you’re goal is to increase MRR from your existing members, then you may want to explore upselling promotions, such as:
- Offering a discounted top-up pass for conference room bookings or other amenities that your members do not have unlimited access
- Offering your day pass holders a new membership type that includes 5 days a month but additional perks, such as discounts on meeting rooms or 1 free event each month
- Offering a pass that unlocks a discount for select bookings for the next 6 months
As a best practice, your promotional strategy should be timely, relevant, and attractive to your ideal customer profile (ICP) or target member (if you’re looking for ideas to market it, then check out our 23 ideas to market your coworking space for inspiration).
Now that we know what we want to achieve and how we’re going to achieve it, let’s take a look at how you can use coworking space automation software like Optix to execute.
Using promo codes to acquire net new members for your coworking space
Promo codes are the bread and butter of many e-commerce and direct-to-consumer brands. Turns out, they can be highly effective for coworking spaces, too.
A promo code is a single-use code that can be used by a member to unlock a discount or promotion. They are typically a series of numbers and/or letters like “1FREEDAY” or “BLACKFRIDAY2024”.
Pro Tip: Giving your promo code a name that is relevant to the promotion itself can help you keep track of which promo codes are used so you can better measure their effectiveness.
Promo codes help encourage price-sensitive people and deal seekers to take action, while getting people in the door. Ideally, once this person sees the value of your coworking space, they will be inclined to stay.
You may not generate as much revenue per person with promo codes compared to regular pricing, however revenue should be made up (and exceeded) in volume and the conversion of new users to members.
Here’s how we’ll set up a promo code in Optix to automatically apply credit to anyone purchasing a dedicated desk membership.
1. Create your promo codes in Optix
Create a new custom user property field for “Promo Code” in Optix. A user property is any data point you ask your members to input when creating their profile in Optix. They are completely customizable and can be public or private depending on your needs.
When creating your user property, make sure it is visible on the user sign-up or the inquiry widget, depending on what widgets you’re using. This means any person who signs up to your space, either via your widgets or app, will see an open text field labeled “Promo Code”.
2. Set up your automation
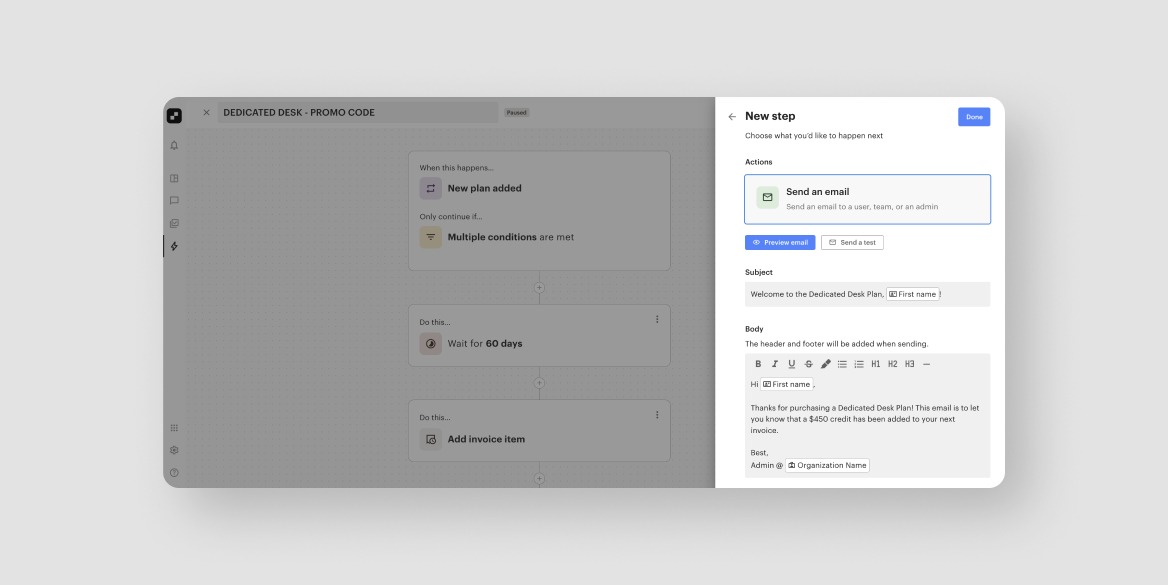
Once you’ve added your user property, we’ll head over to the Automations tab to set up a simple automation that ensures any time someone purchases a dedicated desk membership with this promo code, they’ll get a credit for their third month. Here’s how.
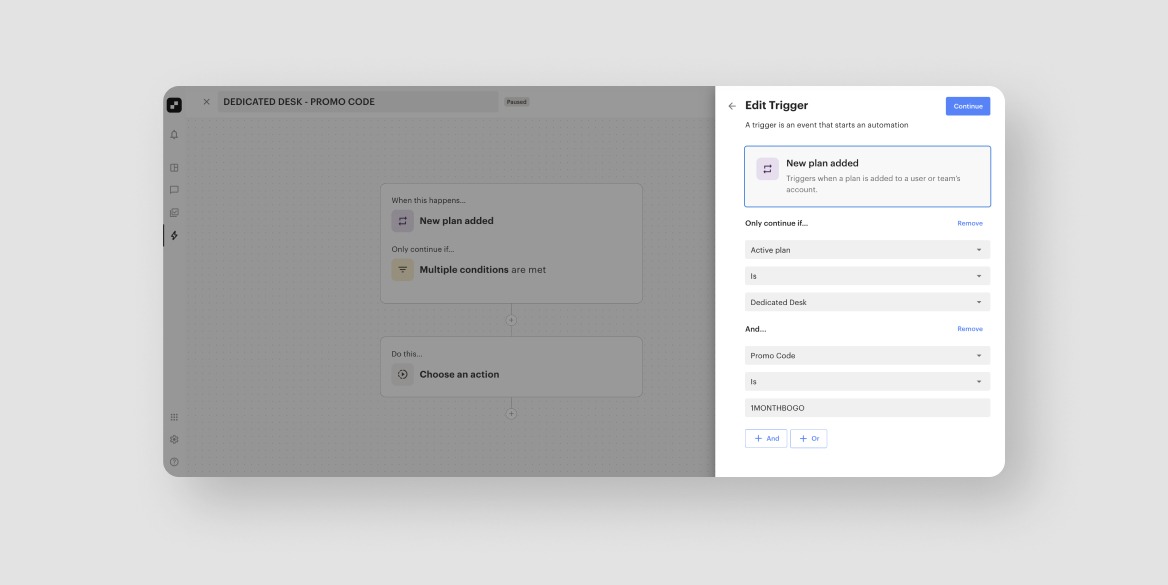
1. Set your trigger: ‘New Plan Added’. This ensures that our automation will start anytime a user purchases your Dedicated Desk Plan Template. But that’s not all, is it…
2. Add your conditions: for our example, we’ll have two conditions. This ensures only members who match the following criteria will move to the next step. Our conditions are:
- Active plan is ‘Dedicated Desk ’ AND
- Promo code is 1MONTHBOGO
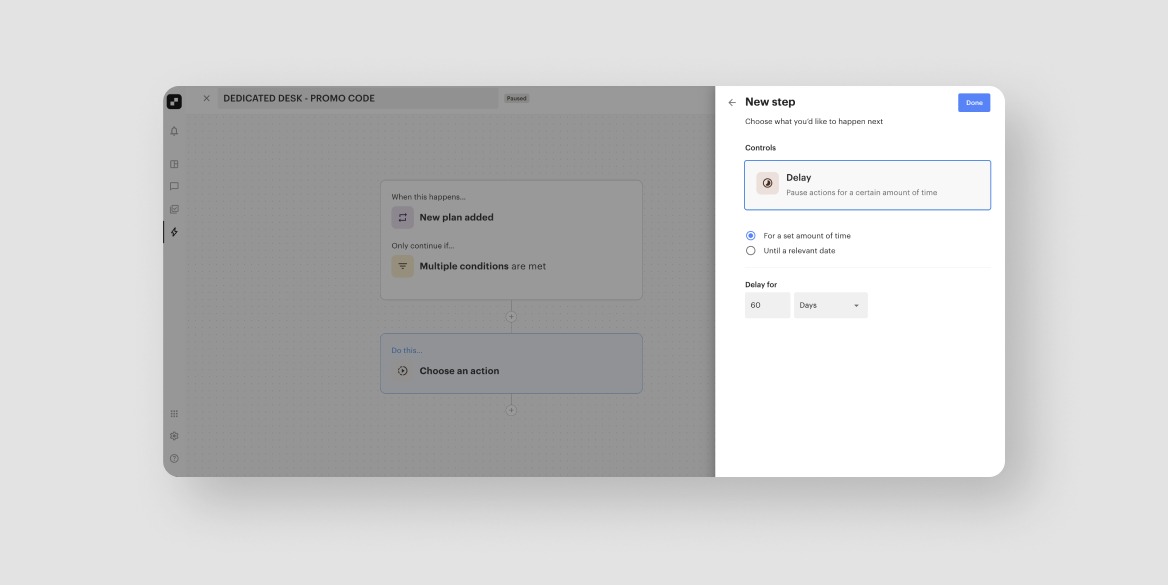
3. Set a delay: because we only want members to get a credit on their third month, we will set a delay of 60 days.
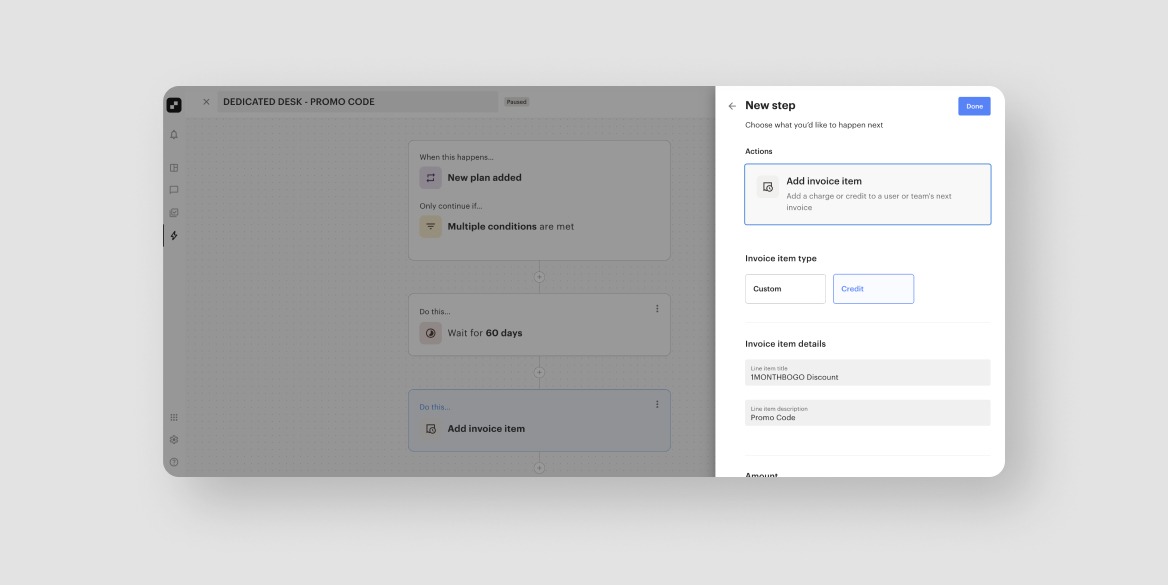
4. Define your action: ‘Add invoice item’. After their first month, the member will receive a $450 credit on their invoice.
5. Set another action that includes a custom message or email: this message can come from any admin you’d like and outline details of the promotion. This isn’t technically necessary, but it is a delightful touch!
Pro tip: Add an additional few steps to delay 61 days with another action to send a message confirming the credit has been added to their account. You can also add a step to “change account type to Promo Member”. This can help you better target these members in the future.
Now, any new member who uses this promo code when they purchase the Dedicated Desk Plan will be automatically enrolled in this automation. Once enrolled, they’ll receive a $450 credit, or the equivalent of a free month, on their second invoice.
Upselling existing coworking space members with exclusive discounts or incentives
Promo codes are great for getting net new members in the door. But what about upselling existing members?
Turns out, discounts and incentives can be great for upselling too – let’s take a look.
1. Design your upselling strategy
Strategic upselling starts with understanding your sales funnel. Without knowing where your members are in their journey with your space – or what that journey even is – you can’t thoughtfully move them from one step to the next.
To design your upselling strategy, start by:
- Defining your definition of an ideal member at your organization: who is it that you’re trying to attract to your space and what type of plan would they be purchasing?
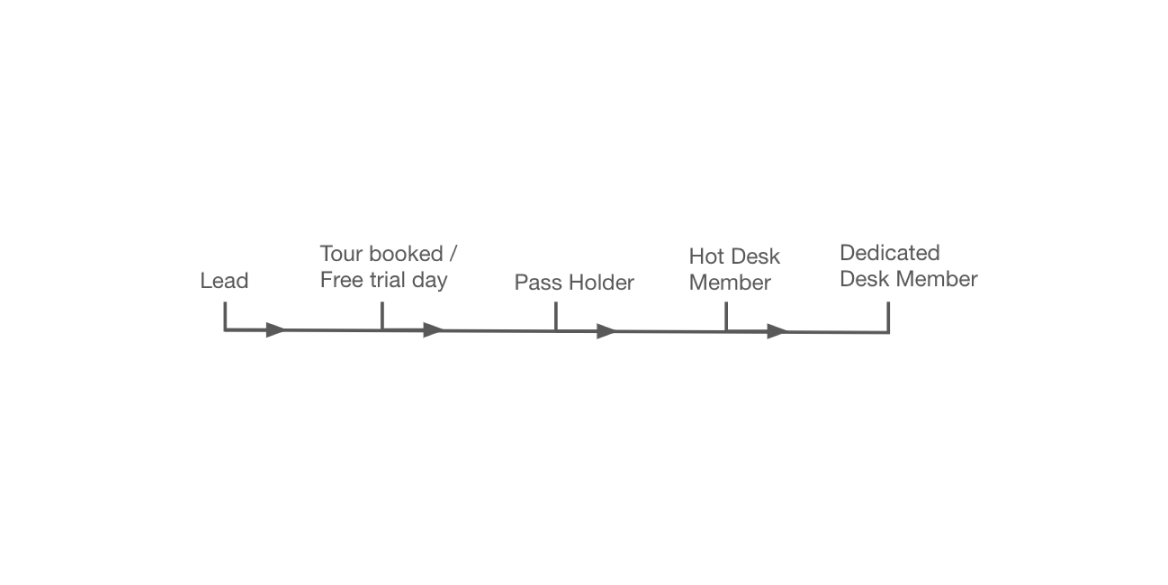
- Outlining your sales funnel or milestone steps someone would take before becoming a member: for many, this will start at “lead” and end with purchasing a monthly plan
- Reviewing your analytics to set your targets: take a look at how members convert from one stage to another at baseline to measure your initiative against
Examples of a sales funnel for a coworking space
2. Map out your account types in Optix to match your sales funnel
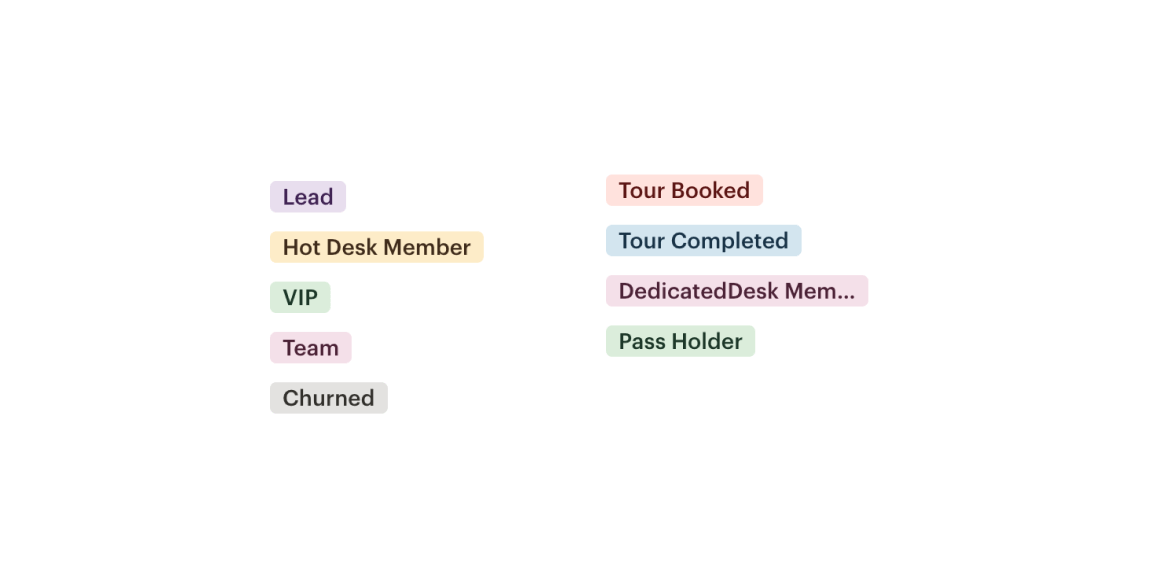
Account types are powerful tags that help classify users as different kinds, or types, of members in your space. By strategically setting up your account types to match your sales funnel, you can create automations that help move members from one stage to the next, essentially automating a key part of your CRM.
For our example, your account types might look something like this:
Pro Tip: You can create Automations to update all your Users account types automatically when they take the specific action associated with that stage of your sales funnel (ie. When they book a tour via the Optix Tour Widget, an Automation can change their type to ‘Tour Booked’).
3. Set up automations to help nudge members from one stage to the next
Now that you’ve laid the foundation for your promo strategy, it’s onto the fun part: creating your automations!
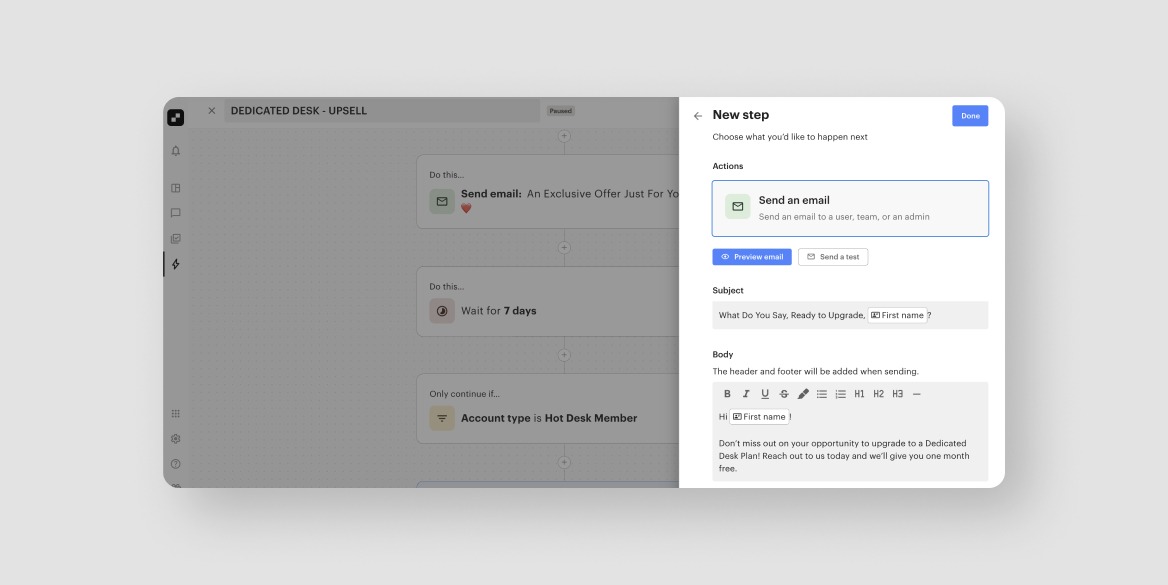
We’ll walk you through how to set up one automation to move someone from one stage of the funnel to the next. We’ll focus on hitting our goal of selling more dedicated desk memberships by creating an automation to help upsell hot desk members to dedicated desk members.
However, we recommend using the Duplicate an Automation feature to mimic this automation or a similar one across your entire sales funnel. All you’ll need to do is change the account type and your email copy – otherwise the set-up stays the same!
Without further ado…
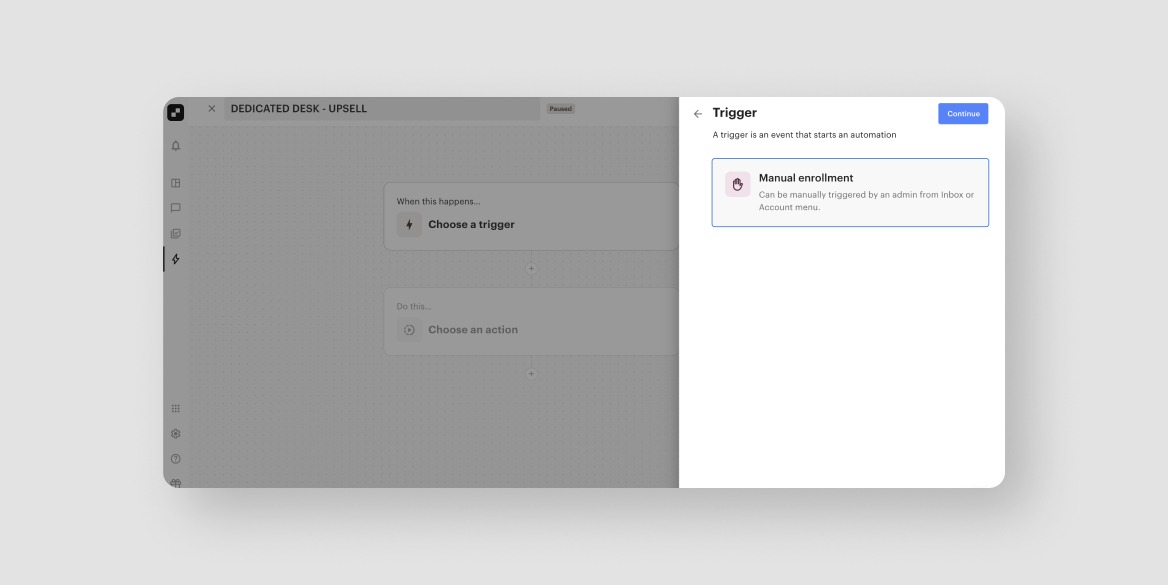
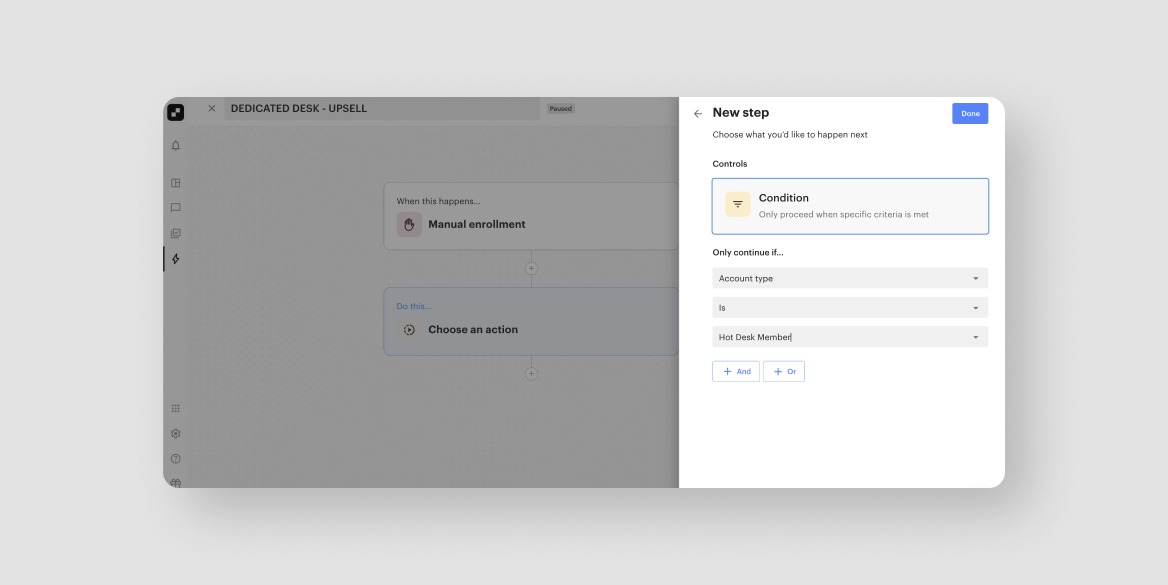
1. Set your trigger: Manual enrolment. A manual enrolment means you as an admin can select specific users to enrol into this automation. For this example, you would manually enroll any hot desk members into this automation to upsell them to dedicated desk members.
2. Add your conditions: for our example, our condition is account type is Hot Desk Member.
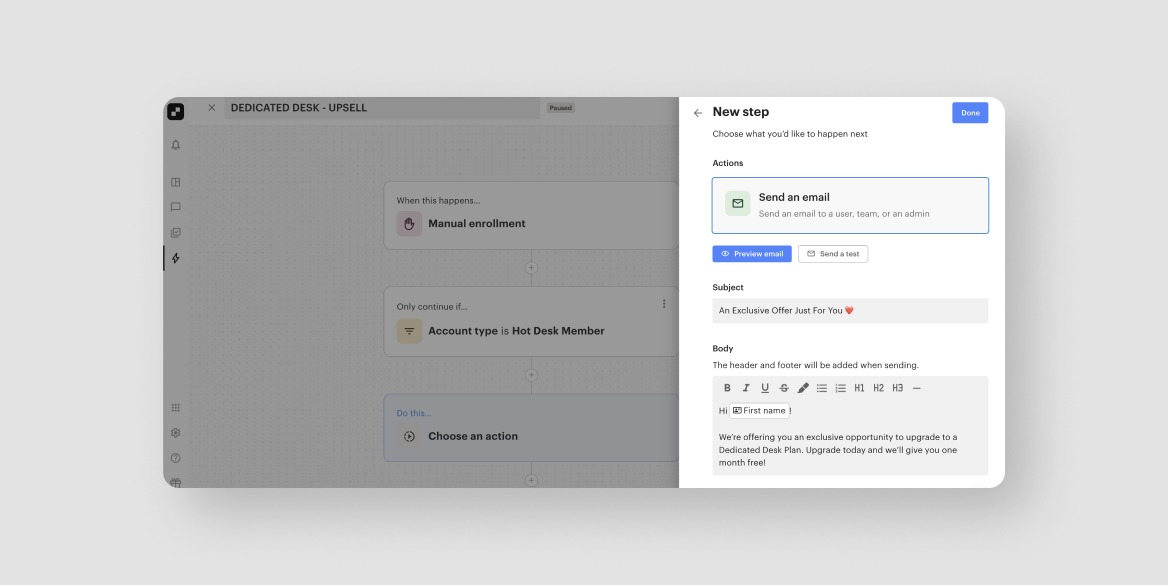
3. Define your action: we’ll be crafting a killer email with an exclusive promotion inviting Hot Desk members to purchase a dedicated desk plan.
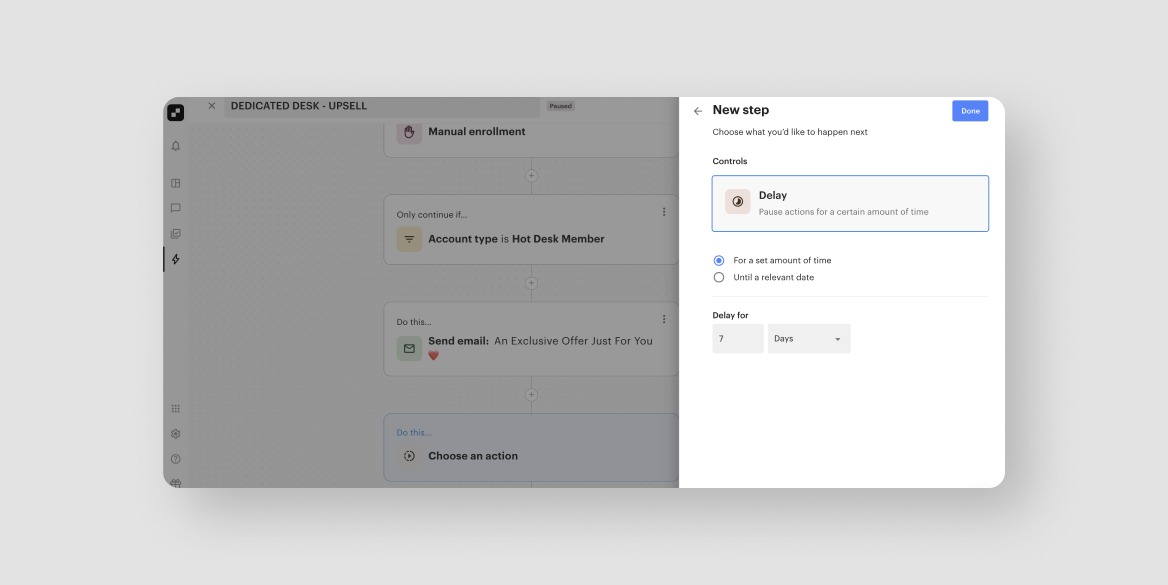
4. Set a delay: this one is time sensitive, so we’ll set a delay of 7 days.
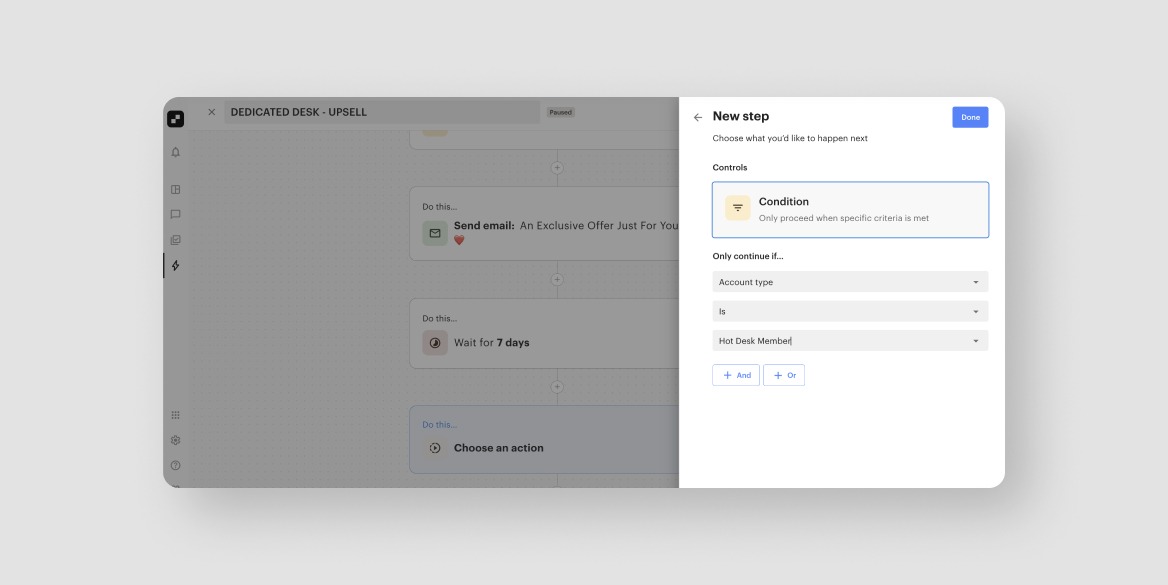
5. Add a condition: any time we have a delay, we want the system to check and make sure they are still a Hot Desk member. If they are, this means they haven’t purchased a dedicated desk membership yet.
6. Send another email: let’s give our members another nudge or additional incentive to get them to take action asap!
Rinse and repeat your delays, account type condition and email as many times as you want until members take appropriate action!
BONUS: Order your plans/passes based on what you want members to buy
Want to encourage members to purchase a specific plan – like a dedicated desk membership – during a promotional period? Order your plans and passes so that the first thing any member sees is the Dedicated Desk Membership at the top to encourage them to interact with it, first.
It’s super easy to do in your Optix settings, and is a low effort way of promoting a specific product or service. You can also promote specific plans and passes on your homescreen for more visibility!
Learn more about ordering your Plans and Passes in this helpful FAQ →
Get started with Automations+ today
These are just two examples of all of the amazing things that you can do with Automations in Optix. But with 1,000+ combinations, the possibilities for what you can accomplish truly are endless.
If you’re an Optix client, hop into your dashboard and get started with creating your first automation – it’s completely free.
If you’re not an Optix client, set up a time to chat with a member of our team and we would be happy to set up a time to chat!
Automate your coworking space with Optix


